

Learn through the super-clean Baeldung Pro experience:
>> Membership and Baeldung Pro.
No ads, dark-mode and 6 months free of IntelliJ Idea Ultimate to start with.
Last updated: July 31, 2024
Learn through the super-clean Baeldung Pro experience:
>> Membership and Baeldung Pro.
No ads, dark-mode and 6 months free of IntelliJ Idea Ultimate to start with.
In this tutorial, we’ll look at how to authenticate a Linux client through an Active Directory. Firstly, we’ll connect our machine to the Active Directory domain. Then, we’ll use the Active Directory as the center for managing all users, simplifying and making administration work easier. Further, we’ll use sssd to authenticate user logins against an Active Directory using sssd’s Active Directory feature.
We’ll focus on joining Linux client machines to an Active Directory for authentication. Our Active Directory has a single forest. We’ve got a single Linux computer for this tutorial, with one local user, ‘kisumu’. Later, we’ll create random users from the server and test login from the client machine.
Before any Linux client joins an Active Directory, it must be configured. Let’s check if the following have been configured. If not, we must fix them before proceeding:
For this tutorial, we’ll use the following as our Active Domain configuration:
Next, we prepare our Ubuntu computer to join the Active Directory. We must add some required packages forthe integration to be effortless and successful. Firstly, we’ve got to update our apt index in our Linux system:
$ sudo apt -y updateThen, for computers with version 18 or lower, we need to add these repositories to their source.list file:
$ sudo vi /etc/apt/sources.list
deb http://us.archive.ubuntu.com/ubuntu/ bionic universe
deb http://us.archive.ubuntu.com/ubuntu/ bionic-updates universeFollowing this, we must set the appropriate hostname for our Linux computer. Let’s check the current hostname (computer name):
$ hostnamectl
Static hostname: kisumubox
Icon name: computer-vm
Chassis: vm
Next, let’s set our preferred hostname:
$ sudo hostnamectl set-hostname kisumu.nairobi.local
$ hostnamectl
 Static hostname: kisumu.nairobi.local
       Icon name: computer-vm
         Chassis: vm
Operating System: Ubuntu 22.04.1 LTS
          Kernel: Linux 5.15.0-58-generic
From the output, the hostname has been changed to the one we specified.
Subsequently, let’s configure our DNS setting. We’ll edit the resolv.conf and append our Active Directory’s IP as the second DNS address:
$ sudo vi /etc/resolv.conf
$ sudo cat /etc/resolv.conf | tail
# See man:systemd-resolved.service(8) for details about the supported modes of
# operation for /etc/resolv.conf.
nameserver 127.0.0.53
nameserver 192.168.29.154
options edns0 trust-ad
search .
Manually editing the resolv.conf file isn’t recommended since anything added is lost upon reboot or shutdown. We should automate it.
The most recommended way to add our Active Directory as a DNS server is by configuring it on the router (only if we’ve access to the router). This makes it easier because when a client requests for an IP address, the DNS information is also provided. This saves time as we don’t need to log into each client machine to configure the DNS.
Now, let’s get the packages we require for the integration to be possible and install them:
$ sudo apt update
$ sudo apt -y install realmd libnss-sss libpam-sss sssd sssd-tools adcli samba-common-bin oddjob oddjob-mkhomedir packagekitBefore discovering the Active Domain, we should ensure that all the required packages have been installed successfully. If not, the succeeding steps will fail.
We’ll use the realm discover command to locate the Active Directory domain. realm is a command line tool that can manage enrollment in Kerberos realms, like Active Directory domains or IPA domains. The discover option allows the system to find a realm/domain and its capabilities. On running it, it performs several assessments and determines the best software stack to use with sssd:
$ sudo realm discover nairobi.local
  nairobi.local
  type: kerberos
  realm-name: NAIROBI.LOCAL
  domain-name: nairobi.local
  configured: no
  server-software: active-directory
  client-software: sssd
  required-package: sssd-tools
  required-package: sssd
  required-package: libnss-sss
  required-package: libpam-sss
  required-package: adcli
  required-package: samba-common-bin
Furthermore, the command returns a complete domain configuration and a list of the required packages that must be installed to enroll a system into a domain (we’ve already installed these necessary packages). Additionally, sssd can install missing packages via packagekit.
The realm join command sets up our computer for use with a specified domain by configuring the local system services and the entries in the identity domain:
$ sudo realm join nairobi.local
Password for Administrator:
$ sudo realm join -v nairobi.local
 * Resolving: _ldap._tcp.nairobi.local
 * Performing LDAP DSE lookup on: 192.168.29.154
 * Successfully discovered: nairobi.local
realm: Already joined to this domain
The above command will join our computer to the Active Domain using our entered credentials. If an error occurs, it will display the error or show that it wasn’t successful. We must note that in case we’re using another account different from the Administrator, then we’ve got to pass that account name using the -U flag:
$ sudo realm join -U differentAccountname nairobi.localSecondly, if we want to join an Active Domain using a one-time password, we’ll use the –one-time-password option. However, it isn’t possible with all types of realms.
Thirdly, to view what’s happening, we add the -v flag:
$ sudo realm join -v nairobi.localTo view our current realmd details, we run the realm list command. The output should be similar to that of realm discover.
Let’s view the /etc/sssd/sssd.conf file:
$ sudo cat /etc/sssd/sssd.conf
[sssd]
domains = nairobi.local
config_file_version = 2
services = nss, pam
[domain/nairobi.local]
default_shell = /bin/bash
krb5_store_password_if_offline = True
cache_credentials = True
krb5_realm = NAIROBI.LOCAL
realmd_tags = manages-system joined-with-adcli
id_provider = ad
fallback_homedir = /home/%u@%d
ad_domain = nairobi.local
use_fully_qualified_names = True
ldap_id_mapping = True
access_provider = ad
By default, the realm command has already configured this file. It added the pam and nss modules and started the necessary services.
From the configurations file, we can observe a few things:
The realm command doesn’t set up pam_mkhomedir. Let’s configure it:
$ sudo pam-auth-update --enable mkhomedirThis ensures that each user gets a home directory after logging in.
Now that we’ve successfully integrated our Ubuntu machine with the Active Directory let’s create users and test the authentication. On our Active Directory, let’s create users and test login from the Ubuntu machine.
Firstly, let’s create a user named ‘wess’ on the Active Directory:

To test from the command line, let’s run the following commands:
$ getent passwd [email protected]
[email protected]:*:1951601104:1951600513:wess ws. nathan:/home/[email protected]:/bin/bash
$ getent passwd [email protected]
[email protected]:*:1951600500:1951600513:Administrator:/home/[email protected]:/bin/bash
$ id [email protected]
uid=1951600500([email protected]) gid=1951600513(domain [email protected]) groups=1951600513(domain [email protected]),1951600572(denied rodc password replication [email protected]),1951600512(domain [email protected]),1951600520(group policy creator [email protected]),1951600519(enterprise [email protected]),1951600518(schema [email protected])
$ id [email protected]
uid=1951601104([email protected]) gid=1951600513(domain [email protected]) groups=1951600513(domain [email protected])
Because the integration is successful and the Active Directory authenticates the users, we’ve got the users’ Active Directory information.
Also, we can test system login using the sudo login command:
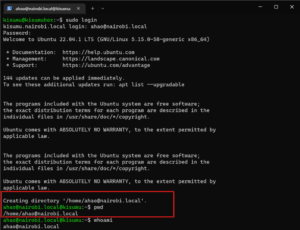
$ sudo login
kisumu.nairobi.local login: [email protected]
This will prompt us for the password of that user. Afterward, the user’s home directory is created:
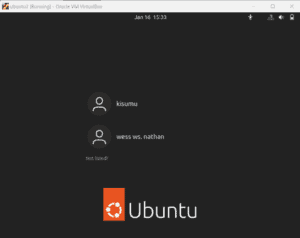
Let’s use the Ubuntu client machine to log in. On the login page, let’s click the Not listed option.
Next, we enter our username and password. The username should be in the format user@domain. The system will authenticate us, and we’ll log in. On our next logon, we should be able to see our account listed on the login window :
In this article, we’ve looked at how to authenticate Linux users using the Active Directory. We also discussed the configurations that must be set before clients join the Active Directory. Next, we covered how to join the client to the Active Directory. We shouldn’t forget to synchronize the time between the server and the client. Otherwise, we’ll experience login problems. Finally, we should ensure we’ve set the right hostname and DNS nameserver in both the server and client.