Form Validation with AngularJS and Spring MVC
Last updated: January 8, 2024


Mocking is an essential part of unit testing, and the Mockito library makes it easy to write clean and intuitive unit tests for your Java code.
Get started with mocking and improve your application tests using our Mockito guide:
Handling concurrency in an application can be a tricky process with many potential pitfalls. A solid grasp of the fundamentals will go a long way to help minimize these issues.
Get started with understanding multi-threaded applications with our Java Concurrency guide:
Spring 5 added support for reactive programming with the Spring WebFlux module, which has been improved upon ever since. Get started with the Reactor project basics and reactive programming in Spring Boot:
Since its introduction in Java 8, the Stream API has become a staple of Java development. The basic operations like iterating, filtering, mapping sequences of elements are deceptively simple to use.
But these can also be overused and fall into some common pitfalls.
To get a better understanding on how Streams work and how to combine them with other language features, check out our guide to Java Streams:
Explore Spring Boot 3 and Spring 6 in-depth through building a full REST API with the framework:
Yes, Spring Security can be complex, from the more advanced functionality within the Core to the deep OAuth support in the framework.
I built the security material as two full courses - Core and OAuth, to get practical with these more complex scenarios. We explore when and how to use each feature and code through it on the backing project.
You can explore the course here:
Spring Data JPA is a great way to handle the complexity of JPA with the powerful simplicity of Spring Boot.
Get started with Spring Data JPA through the guided reference course:
Refactor Java code safely — and automatically — with OpenRewrite.
Refactoring big codebases by hand is slow, risky, and easy to put off. That’s where OpenRewrite comes in. The open-source framework for large-scale, automated code transformations helps teams modernize safely and consistently.
Each month, the creators and maintainers of OpenRewrite at Moderne run live, hands-on training sessions — one for newcomers and one for experienced users. You’ll see how recipes work, how to apply them across projects, and how to modernize code with confidence.
Join the next session, bring your questions, and learn how to automate the kind of work that usually eats your sprint time.
Distributed systems often come with complex challenges such as service-to-service communication, state management, asynchronous messaging, security, and more.
Dapr (Distributed Application Runtime) provides a set of APIs and building blocks to address these challenges, abstracting away infrastructure so we can focus on business logic.
In this tutorial, we'll focus on Dapr's pub/sub API for message brokering. Using its Spring Boot integration, we'll simplify the creation of a loosely coupled, portable, and easily testable pub/sub messaging system:
1. Overview
Validation is never quite as straightforward as we expect. And of course validating the values entered by a user into an application is very important for preserving the integrity of our data.
In the context of a web application, data input is usually done using HTML forms and requires both client-side and server-side validation.
In this tutorial, we’ll have a look at implementing client-side validation of form input using AngularJS and server-side validation using the Spring MVC framework.
This article focuses on Spring MVC. Our article Validation in Spring Boot describes how to do validations in Spring Boot.
2. Maven Dependencies
To start off, let’s add the following dependencies:
<dependency>
    <groupId>org.springframework</groupId>
    <artifactId>spring-webmvc</artifactId>
    <version>4.3.7.RELEASE</version>
</dependency>
<dependency>
    <groupId>org.hibernate.validator</groupId>
    <artifactId>hibernate-validator</artifactId>
    <version>8.0.1.Final</version>
</dependency>
<dependency>
    <groupId>com.fasterxml.jackson.core</groupId>
    <artifactId>jackson-databind</artifactId>
    <version>2.13.0</version>
</dependency>
The latest versions of spring-webmvc, hibernate-validator and jackson-databind can be downloaded from Maven Central.
3. Validation Using Spring MVC
An application should never rely solely on client-side validation, as this can be easily circumvented. To prevent incorrect or malicious values from being saved or causing improper execution of the application logic, it is important to validate input values on the server side as well.
Spring MVC offers support for server-side validation by using JSR 349 Bean Validation specification annotations. For this example, we will use the reference implementation of the specification, which is hibernate-validator.
3.1. The Data Model
Let’s create a User class that has properties annotated with appropriate validation annotations:
public class User {

    @NotNull
    @Email
    private String email;

    @NotNull
    @Size(min = 4, max = 15)
    private String password;

    @NotBlank
    private String name;

    @Min(18)
    @Digits(integer = 2, fraction = 0)
    private int age;

    // standard constructor, getters, setters
}
The annotations used above belong to the JSR 349 specification, with the exception of @Email and @NotBlank, which are specific to the hibernate-validator library.
3.2. Spring MVC Controller
Let’s create a controller class that defines a /user endpoint, which will be used to save a new User object to a List.
In order to enable validation of the User object received through request parameters, the declaration must be preceded by the @Valid annotation, and the validation errors will be held in a BindingResult instance.
To determine if the object contains invalid values, we can use the hasErrors() method of BindingResult.
If hasErrors() returns true, we can return a JSON array containing the error messages associated with the validations that did not pass. Otherwise, we will add the object to the list:
@PostMapping(value = "/user")
@ResponseBody
public ResponseEntity<Object> saveUser(@Valid User user,
  BindingResult result, Model model) {
    if (result.hasErrors()) {
        List<String> errors = result.getAllErrors().stream()
          .map(DefaultMessageSourceResolvable::getDefaultMessage)
          .collect(Collectors.toList());
        return new ResponseEntity<>(errors, HttpStatus.OK);
    } else {
        if (users.stream().anyMatch(it -> user.getEmail().equals(it.getEmail()))) {
            return new ResponseEntity<>(
              Collections.singletonList("Email already exists!"),
              HttpStatus.CONFLICT);
        } else {
            users.add(user);
            return new ResponseEntity<>(HttpStatus.CREATED);
        }
    }
}
As you can see, server-side validation adds the advantage of having the ability to perform additional checks that are not possible on the client side.
In our case, we can verify whether a user with the same email already exists – and return a status of 409 CONFLICT if that’s the case.
We also need to define our list of users and initialize it with a few values:
private List<User> users = Arrays.asList(
  new User("[email protected]", "pass", "Ana", 20),
  new User("[email protected]", "pass", "Bob", 30),
  new User("[email protected]", "pass", "John", 40),
  new User("[email protected]", "pass", "Mary", 30));
Let’s also add a mapping for retrieving the list of users as a JSON object:
@GetMapping(value = "/users")
@ResponseBody
public List<User> getUsers() {
    return users;
}
The final item we need in our Spring MVC controller is a mapping to return the main page of our application:
@GetMapping("/userPage")
public String getUserProfilePage() {
    return "user";
}
We will take a look at the user.html page in more detail in the AngularJS section.
3.3. Spring MVC Configuration
Let’s add a basic MVC configuration to our application:
@Configuration
@EnableWebMvc
@ComponentScan(basePackages = "com.baeldung.springmvcforms")
class ApplicationConfiguration implements WebMvcConfigurer {

    @Override
    public void configureDefaultServletHandling(
      DefaultServletHandlerConfigurer configurer) {
        configurer.enable();
    }

    @Bean
    public InternalResourceViewResolver htmlViewResolver() {
        InternalResourceViewResolver bean = new InternalResourceViewResolver();
        bean.setPrefix("/WEB-INF/html/");
        bean.setSuffix(".html");
        return bean;
    }
}
3.4. Initializing the Application
Let’s create a class that implements WebApplicationInitializer interface to run our application:
public class WebInitializer implements WebApplicationInitializer {

    public void onStartup(ServletContext container) throws ServletException {

        AnnotationConfigWebApplicationContext ctx
          = new AnnotationConfigWebApplicationContext();
        ctx.register(ApplicationConfiguration.class);
        ctx.setServletContext(container);
        container.addListener(new ContextLoaderListener(ctx));

        ServletRegistration.Dynamic servlet
          = container.addServlet("dispatcher", new DispatcherServlet(ctx));
        servlet.setLoadOnStartup(1);
        servlet.addMapping("/");
    }
}
3.5. Testing Spring Mvc Validation Using Curl
Before we implement the AngularJS client section, we can test our API using cURL with the command:
curl -i -X POST -H "Accept:application/json"
  "localhost:8080/spring-mvc-forms/user?email=aaa&password=12&age=12"
The response is an array containing the default error messages:
[
    "not a well-formed email address",
    "size must be between 4 and 15",
    "may not be empty",
    "must be greater than or equal to 18"
]
4. AngularJS Validation
Client-side validation is useful in creating a better user experience, as it provides the user with information on how to successfully submit valid data and enables them to be able to continue to interact with the application.
The AngularJS library has great support for adding validation requirements on form fields, handling error messages, and styling valid and invalid forms.
First, let’s create an AngularJS module that injects the ngMessages module, which is used for validation messages:
var app = angular.module('app', ['ngMessages']);Next, let’s create an AngularJS service and controller that will consume the API built in the previous section.
4.1. The AngularJS Service
Our service will have two methods that call the MVC controller methods — one to save a user, and one to retrieve the list of users:
app.service('UserService',['$http', function ($http) {

    this.saveUser = function saveUser(user){
        return $http({
          method: 'POST',
          url: 'user',
          params: {email:user.email, password:user.password,
            name:user.name, age:user.age},
          headers: 'Accept:application/json'
        });
    }

    this.getUsers = function getUsers(){
        return $http({
          method: 'GET',
          url: 'users',
          headers:'Accept:application/json'
        }).then( function(response){
        	return response.data;
        } );
    }

}]);
4.2. The AngularJS Controller
The UserCtrl controller injects the UserService, calls the service methods and handles the response and error messages:
app.controller('UserCtrl', ['$scope','UserService', function ($scope,UserService) {

	$scope.submitted = false;

	$scope.getUsers = function() {
		   UserService.getUsers().then(function(data) {
		       $scope.users = data;
	       });
	   }

    $scope.saveUser = function() {
    	$scope.submitted = true;
    	  if ($scope.userForm.$valid) {
            UserService.saveUser($scope.user)
              .then (function success(response) {
                  $scope.message = 'User added!';
                  $scope.errorMessage = '';
                  $scope.getUsers();
                  $scope.user = null;
                  $scope.submitted = false;
              },
              function error(response) {
                  if (response.status == 409) {
                    $scope.errorMessage = response.data.message;
            	  }
            	  else {
                    $scope.errorMessage = 'Error adding user!';
            	  }
                  $scope.message = '';
            });
    	  }
    }

   $scope.getUsers();
}]);
We can see in the example above that the service method is called only if the $valid property of userForm is true. Still, in this case, there is the additional check for duplicate emails, which can only be done on the server and is handled separately in the error() function.
Also, notice that there is a submitted variable defined which will tell us if the form has been submitted or not.
Initially, this variable will be false, and on invocation of the saveUser() method, it becomes true. If we don’t want validation messages to show before the user submits the form, we can use the submitted variable to prevent this.
4.3. Form Using AngularJS Validation
In order to make use of the AngularJS library and our AngularJS module, we will need to add the scripts to our user.html page:
<script src="https://ajax.googleapis.com/ajax/libs/angularjs/1.5.6/angular.min.js">
</script>
<script src="https://ajax.googleapis.com/ajax/libs/angularjs/1.4.0/angular-messages.js">
</script>
<script src="js/app.js"></script>
Then we can use our module and controller by setting the ng-app and ng-controller properties:
<body ng-app="app" ng-controller="UserCtrl">Let’s create our HTML form:
<form name="userForm" method="POST" novalidate
  ng-class="{'form-error':submitted}" ng-submit="saveUser()" >
...
</form>
Note that we have to set the novalidate attribute on the form in order to prevent default HTML5 validation and replace it with our own.
The ng-class attribute adds the form-error CSS class dynamically to the form if the submitted variable has a value of true.
The ng-submit attribute defines the AngularJS controller function that will be called when the form in submitted. Using ng-submit instead of ng-click has the advantage that it also responds to submitting the form using the ENTER key.
Now let’s add the four input fields for the User attributes:
<label class="form-label">Email:</label>
<input type="email" name="email" required ng-model="user.email" class="form-input"/>

<label class="form-label">Password:</label>
<input type="password" name="password" required ng-model="user.password"
  ng-minlength="4" ng-maxlength="15" class="form-input"/>

<label class="form-label">Name:</label>
<input type="text" name="name" ng-model="user.name" ng-trim="true"
  required class="form-input" />

<label class="form-label">Age:</label>
<input type="number" name="age" ng-model="user.age" ng-min="18"
  class="form-input" required/>
Each input field has a binding to a property of the user variable through the ng-model attribute.
For setting validation rules, we use the HTML5 required attribute and several AngularJS-specific attributes: ng-minglength, ng-maxlength, ng-min, and ng-trim.
For the email field, we also use the type attribute with a value of email for client-side email validation.
In order to add error messages corresponding to each field, AngularJS offers the ng-messages directive, which loops through an input’s $errors object and displays messages based on each validation rule.
Let’s add the directive for the email field right after the input definition:
<div ng-messages="userForm.email.$error"
  ng-show="submitted && userForm.email.$invalid" class="error-messages">
    <p ng-message="email">Invalid email!</p>
    <p ng-message="required">Email is required!</p>
</div>
Similar error messages can be added for the other input fields.
We can control when the directive is displayed for the email field using the ng-show property with a boolean expression. In our example, we display the directive when the field has an invalid value, meaning the $invalid property is true, and the submitted variable is also true.
Only one error message will be displayed at a time for a field.
We can also add a check mark sign (represented by HEX code character ✓) after the input field in case the field is valid, depending on the $valid property:
<div class="check" ng-show="userForm.email.$valid">✓</div>AngularJS validation also offers support for styling using CSS classes such as ng-valid and ng-invalid or more specific ones like ng-invalid-required and ng-invalid-minlength.
Let’s add the CSS property border-color:red for invalid inputs inside the form’s form-error class:
.form-error input.ng-invalid {
    border-color:red;
}
We can also show the error messages in red using a CSS class:
.error-messages {
color:red;
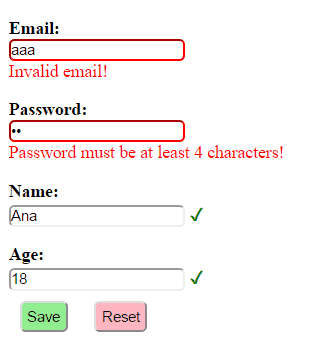
}After putting everything together, let’s see an example of how our client-side form validation will look when filled out with a mix of valid and invalid values:
5. Conclusion
In this tutorial, we’ve shown how we can combine client-side and server-side validation using AngularJS and Spring MVC.
To view the application, access the /userPage URL after running it.